Note, that there is a newer version of this article available.
Most OctoPrint installations out there, will, most likely, run with an ready baked OctoPi image file for the Raspberry Pi. This is obviously the most straight forward approach to get OctoPrint up and running. Still, there are good reasons to run it on a regular machine. You may already run a home server or other Linux system. You also may like to have more processing power, than the RasPi can offer. In the following article, I will describe how I set up OctoPrint on my existing small Linux server, running Ubuntu Server.
All following commands prefixed with a hash mark (#) need to be executed as root by either using sudo (recommended for Ubuntu) or by changing to the root account (Debian).
Preparing Python
Since OctoPrint is written in Python, we need to make sure, that some basic packages are available. At the time of writing, the latest Octoprint version 1.3.11 still uses Python 2.7x. The Ubuntu 18.04 LTS version I’m currently running, also still comes with Python 2.7 as the default.
AFAIK Python 3.x will be supported (or required) starting from version 1.4(?) of Octoprint. If this happens, the setup procedure should basically be the same, just using Python 3.x instead.
# apt install python-pip python-dev python-setuptools git build-essentialUpdate: If you want to use Python 3.x instead of Python 2.x, I recommend reading the updated article.
Creating a new user
Now, we add a new user for running OctoPrint. I simply added a new regular user account in /home, called octoprint. Also make sure to add the new user to the user group dialout. This will make sure that the user has permission to access the USB-to-UART serial device. Obviously you may call the user however you like. Just make sure to replace the name octoprint with your own, in the following text.
First the actual user will be created. The password can be a random string, since the account will be locked and the password disabled anyway.
# adduser octoprint
# passwd -l octoprint
# usermod -a -G dialout octoprint
After executing these commands, there should be a /home/octoprint directory and some basic (hidden) files in it.
Next, we use the su command to change to the user octoprint and verify that we are in the correct (home) directory of that user.
# su - octoprint
octoprint:$ cd
octoprint:$ pwd
/home/octoprint
Another option would be to add a system user with a home directory in, for example, /srv/octoprint. System users don’t have passwords and can’t login regularly. In this case a shell needs to be provided when using the su command: su - -s /bin/bash octoprint. For a single command it’s also possible to use the -c option (example): su - octoprint -s /bin/bash -c "pip install --upgrade --user pip"
Installing OctoPrint using pip
Next, the latest pip (Python package installer) will be installed into the user directory of octoprint, using the global pip:
octoprint:$ pip install --upgrade --user pipThe following command will install OctoPrint itself and all other needed packages into the local user directory:
octoprint:$ /home/octoprint/.local/bin/pip install --user https://get.octoprint.org/latestTesting OctoPrint service
After the installation, it should already be possible to start the OctoPrint service (again, make sure to run this as the octoprint user)
octoprint:$ /home/octoprint/.local/bin/octoprint serveKeep the terminal window open and check your browser, if the service is available on port 5,000. If it is, chances are good everything worked as it’s supposed to. Work through the welcome screen/assistant, presented in your Browser, to setup your instance of Octoprint.
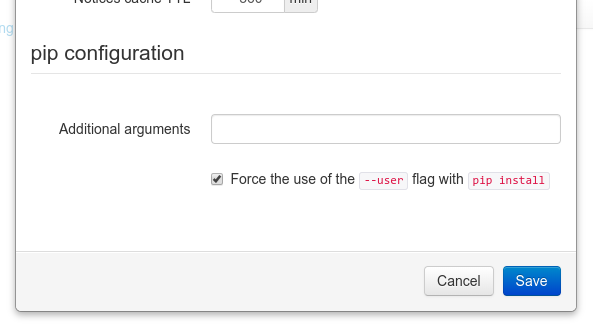
After that, go to Settings (the wrench icon on the top right) and click on Plugin-Manager. There, on the top right, you need to click on a wrench icon again, to access the Plugin configuration.
On the bottom of this windows, you will find an option to force the use of --user for all pip commands executed by OctoPrint. Make sure this box is checked and click on save. This option makes sure, that OctoPrint stays in the local directory of the octoprint user, when installing or updating packages (plugins).
After that, you may or may not test the setup by installing a plugin using the OctoPrint web GUI. This should work fine. If you look into the hidden directory /home/octoprint/.local/lib/<your_python_version>/site-packages, you should find all libraries and packages which have been installed by using the plugin manager.
If you’re done, please stop the currently running server instance by pressing <Ctrl> + <C> in the terminal screen.
Configure systemd
Create a new file called octoprint.service in the /etc/systemd/system directory and paste the following content into it:
[Unit]
Description=Octoprint - Open Source Printing Interface for 3D printers
Documentation=https://docs.octoprint.org
After=network.target

[Service]
User=octoprint
Environment=HOME=/home/octoprint
WorkingDirectory=/home/octoprint
ExecStart=/usr/bin/python2 /home/octoprint/.local/bin/octoprint serve
Restart=always

[Install]
WantedBy=multi-user.target
Since we didn’t provide any additional arguments for the Octoprint script (besides serve), Octoprint will (create and) use the hidden folder .octoprint in the home directory of the user running the process, to store its configuration file and other files uploaded or created by the running service. For more information, please check the Octoprint documentation or start octoprint with the --help option.
The following commands will re-read the systemd configuration files, enable the octoprint.service and also start it immediately and every time the system starts.
# systemctl daemon-reload
# systemctl enable octoprint.service
# systemctl start octoprint.service
You may assure yourself, if OctoPrint is running, by running systemctl status octoprint.service. Also with journalctl -u octoprint.service you may review the log messages OctoPrint printed (and prints) to the console while starting (running).
sudoers.d
If you want Octoprint to be able to restart itself and/or shutdown/restart the whole system, you need to configure the sudo command. Create a new file called octoprint with the following content in the /etc/sudoers.d directory:
# octoprint ALL = NOPASSWD: /bin/systemctl start octoprint.service
# octoprint ALL = NOPASSWD: /bin/systemctl stop octoprint.service
octoprint ALL = NOPASSWD: /bin/systemctl restart octoprint.service
# octoprint ALL = NOPASSWD: /bin/systemctl reboot
# octoprint ALL = NOPASSWD: /bin/systemctl poweroff
In this case, only one line is active, all others have been commented out, because I don’t need/want them. If you do, please remove the # in front of the lines, but keep in mind, that this may or may not be a security issue on your system.
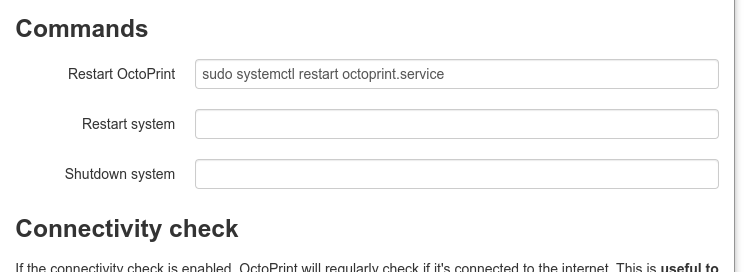
Now you can go to Settings, Server, Commands and enter the necessary commands. For example:
sudo systemctl restart octoprint.serviceIf you want Octoprint to be able to restart (and/or shutdown) the system, you need to add (remove comment) the corresponding line(s) in the /etc/sudoers.d/octoprint file and enter the command using the sudo command in the settings.
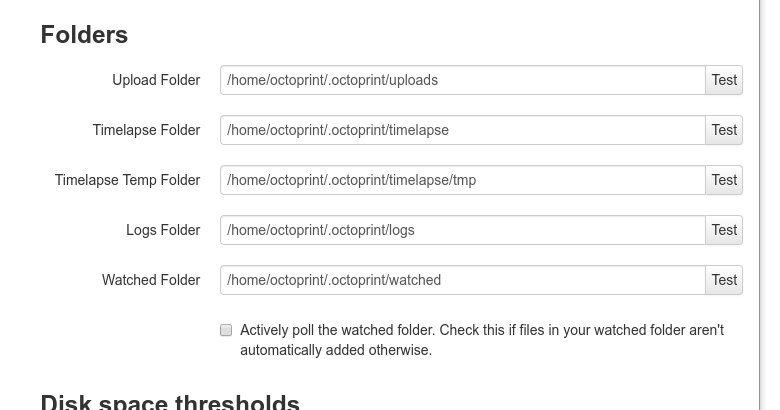
Folders
In the Octoprint settings, in the Folders tab, you may change the path of some of the folders used. Obviously the octoprint user will need to have the necessary permissions to access them in the file system (especially if they are outside of the users’s home directory).
Optional options 🙂
Starting the octoprint script with the --help option, shows some additional options.
octoprint@cf-hub:~$ octoprint --help
Usage: octoprint [OPTIONS] COMMAND [ARGS]...
Options:
-b, --basedir PATH  Specify the basedir to use for configs, uploads,
timelapses etc.
-c, --config PATH   Specify the config file to use.
-v, --verbose       Increase logging verbosity.
--safe              Enable safe mode; disables all third party plugins.
--version           Show the version and exit.
--help              Show this message and exit.
Commands:
analysis  Analysis tools.
client    Basic API client.
config    Basic config manipulation.
daemon    Starts, stops or restarts in daemon mode.
dev       Additional commands for development tasks.
plugins   Additional commands provided by plugins.
safemode  Sets the safe mode flag for the next start.
serve     Starts the OctoPrint server.
If one or more of these options (like --config or --basedir) should be used when running octoprint, they need to be added to the ExecStart= line in the octoprint.service systemd file (before the serve command).
SSL web interface
It is possible to access the OctoPrint web GUI via SSL, by using a third a party software like the web servers Apache or Nginx or a dedicated proxy server like HAProxy.
First of all thank you and congratulations for this remarkable tutorial. I was finally able to correctly install Octoprint on my Debian 9.9.
The only point that I intervened on is to validate the configuration of the .rules file. I actually had to run the command : udevadm control –reload-rules; udevadm trigger – a constraint that may be related to my version. Thanks again. Pierre
Thank you for your comment. You’re right, udev needs to be reloaded or the system rebooted to make the changes take effect. I will add this to the article!
Thank you for this guide!
It took me few hours due to missspelings but it’s working now with my I3mega 🙂
You are creating the system user wrong, instead of selecting a random password, set the shell to /bin/nologin… here’s a better way of installing on a systemd based system such as ubuntu (after installing pip and virtualenv):
sudo mkdir /opt/octoprint
sudo adduser –system –group –shell /bin/nologin –home /opt/octoprint octoprint
sudo chown octoprint:octoprint /opt/octoprint/
cd /opt/octoprint/
sudo -u octoprint virtualenv OctoPrint
sudo -u octoprint OctoPrint/bin/pip install OctoPrint
wget https://github.com/OctoPrint/OctoPrint/raw/master/scripts/octoprint.service
sudo cp octoprint.service /etc/systemd/system/
sudo sed ‘s#/home/pi/OctoPrint/venv/#/opt/octoprint/Octoprint/#’ /etc/systemd/system/octoprint.service
sudo sed ‘s#User=pi#User=octoprint’ /etc/systemd/system/octoprint.service
Forgot to add:
sudo adduser octoprint dialout
sudo systemctl enable octoprint
sudo systemctl start octoprint